Many engineers specify hard anodized finishes without fully understanding the complex electrochemical processes that determine coating quality. This knowledge gap leads to poor part performance, costly rework, and failed specifications when critical applications demand maximum durability.
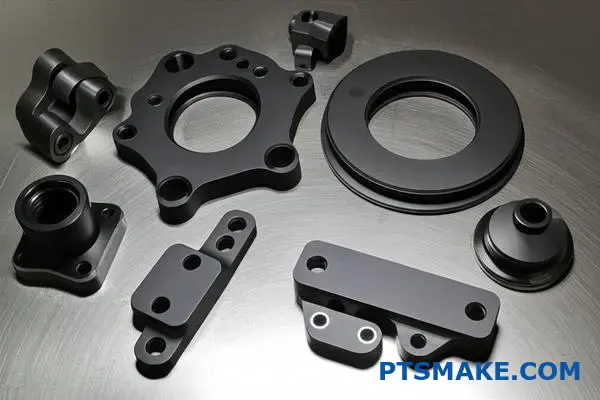
Hard anodizing transforms aluminum into a ceramic-like aluminum oxide layer through controlled electrochemical conversion, creating surface hardness up to 70 HRC while maintaining excellent wear and corrosion resistance for demanding applications.
I’ve worked with hundreds of engineers who needed reliable hard anodizing solutions for critical components. This guide breaks down the technical principles, process parameters, and practical applications you need to specify and achieve consistent results in your manufacturing projects.
Why does hard anodizing fundamentally transform aluminum’s surface?
Many think hard anodizing is just another coating, like paint. But it’s far more profound. It’s a transformation.
Through an electrochemical process, the aluminum surface itself is converted. It becomes a dense, ceramic-like layer of aluminum oxide.
This new surface is not applied; it grows from the base metal. This integration is why a hard anodized finish is so incredibly durable. It can’t chip or peel away.
| Feature | Surface Coating (e.g., Paint) | Hard Anodizing |
|---|---|---|
| Application | Applied on top | Grown from the aluminum |
| Bonding | Adhesion | Molecular Integration |
| Durability | Prone to chipping | Extremely wear-resistant |
The Science of Transformation
So, how does this conversion happen? We immerse an aluminum part in a chilled acidic electrolyte1 and pass a direct electrical current through it. This isn’t random; it’s a highly controlled process we’ve refined at PTSMAKE for various applications.
This current forces oxygen ions from the solution to bond with aluminum atoms on the surface. It’s essentially a process of controlled, accelerated oxidation. The result is a perfectly structured, thick layer of aluminum oxide, which is the essence of what makes a part hard anodized.
Natural vs. Controlled Oxidation
Aluminum naturally forms a thin, passive oxide layer in the air. This layer offers some protection but is very thin and weak. It’s disorganized.
Hard anodizing creates a structure that is thousands of times thicker. It’s dense, ordered, and incredibly hard. The process parameters—like temperature and current density—are critical. We adjust them to achieve specific hardness and thickness for our clients.
| Aspect | Natural Oxidation | Hard Anodizing |
|---|---|---|
| Thickness | Nanometers | Micrometers (e.g., 25-150 µm) |
| Structure | Disorganized, weak | Highly ordered, dense |
| Hardness | Negligible | Exceeds hardened steel |
| Control | Uncontrolled | Precisely controlled |
This level of control is what turns a soft metal into a surface ready for the most demanding industrial environments.
Hard anodizing is not a coating. It’s an electrochemical process that converts the aluminum’s surface into an integrated, ceramic-like oxide layer. This fundamental transformation is the source of its exceptional durability and performance, making it a superior choice for high-wear applications.
How does the ‘hard’ in hard anodizing chemically differ from standard?
The "hard" in hard anodizing isn’t about a different chemical. It’s about building a superior structure from the same one: aluminum oxide.
It all comes down to how the oxide layer forms at a microscopic level. The unique process creates a denser, more organized architecture.
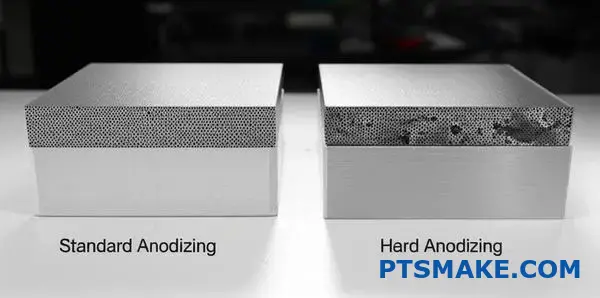
Comparing Oxide Cell Structures
Think of it like building a wall. Standard anodizing uses irregular stones. Hard anodizing uses precisely cut, tightly packed bricks. This creates a much stronger barrier.
Here’s a direct comparison based on our lab findings:
| Feature | Standard Anodizing | Hard Anodizing |
|---|---|---|
| Pore Diameter | Larger, less uniform | Smaller, highly uniform |
| Cell Wall | Thinner | Thicker, more robust |
| Density | Lower | Significantly higher |
This dense structure is what gives hard anodized surfaces their exceptional wear resistance.
The secret lies in controlling the growth environment. We manipulate temperature and electricity to fundamentally change the oxide layer’s cellular makeup. It’s a game of balance between building up and breaking down.
The Role of Process Parameters
The process for a hard anodized finish is much more aggressive. We use higher electrical current densities. At the same time, we drop the electrolyte bath temperature to near-freezing levels, often around 0°C (32°F).
This combination is crucial.
Low Temperature’s Impact
The cold acid bath dramatically slows the chemical dissolution2 of the oxide layer as it forms. This means less of the newly created coating is eaten away by the acid, allowing a thicker layer to build up.
High Current’s Impact
The increased current forces the oxide to grow faster and more aggressively. This rapid, controlled growth, combined with minimal dissolution, creates a very compact and orderly hexagonal cell structure.
This is how we achieve that superior hardness and durability. It’s not magic; it’s controlled electrochemical engineering.
| Process Parameter | Effect on Oxide Structure |
|---|---|
| Low Temperature | Reduces oxide dissolution rate |
| High Current Density | Accelerates oxide growth rate |
| Combined Result | Denser, thicker, harder coating |
In past projects at PTSMAKE, optimizing these parameters has been key to meeting extreme durability specs for clients in aerospace and automotive sectors.
The "hard" in hard anodized aluminum comes from its dense, thick, and highly organized aluminum oxide cell structure. This superior architecture is achieved by using low temperatures and high electrical currents during the process, which minimizes material loss while promoting rapid growth.
What defines the boundary between a Type II and Type III anodize?
The true boundary isn’t just thickness. It’s a combination of tightly controlled process parameters. These factors work together. They create distinct coating properties.
This distinction is crucial for performance. Especially when you need a genuine hard anodized surface. The process recipe defines the outcome.
| Parameter | Type II (Conventional) | Type III (Hardcoat) |
|---|---|---|
| Temperature | 18-22°C (65-72°F) | -2 to 4°C (28-40°F) |
| Acid Concentration | 180-200 g/L | 160-180 g/L |
| Current Density | 12-25 ASF | 24-40 ASF |
These aren’t suggestions; they are requirements. Changing one affects the others. This synergy creates either a Type II or Type III coating.
Standards like MIL-A-8625 are key. They don’t just suggest parameters. They mandate performance outcomes. This is what truly separates the two types.
For Type III, lower temperatures and higher current density3 are used. This slows the dissolution of the oxide layer. At the same time, it promotes faster growth.
The result is a much denser and less porous structure. This microstructure directly translates to superior hardness and abrasion resistance. At PTSMAKE, we focus on these final properties. We ensure every part meets the specification’s demands.
Based on our tests, this controlled process creates a functionally different material on the surface. It’s not just a thicker version of Type II.
| Property | Type II Coating | Type III Coating |
|---|---|---|
| Hardness | 200-400 HV | 600-700 HV |
| Density | Less dense, more porous | Denser, less porous |
| Abrasion Resistance | Good | Excellent |
| Build-up per side | ~33% of thickness | ~50% of thickness |
Ultimately, the MIL-A-8625 specification is the referee. It sets the minimum hardness and wear resistance values that a coating must pass to be certified as Type III.
The boundary is defined by precise process controls and verified by meeting strict performance standards. It’s about achieving the required hardness and density for a true hardcoat finish, not simply reaching a certain thickness.
What is the fundamental purpose of ‘sealing’ a hard anodized surface?
Sealing a hard anodized surface is all about closing the microscopic pores. This process, known as hydration, transforms the aluminum oxide.
It essentially adds a final, protective layer. This step is crucial for many applications.
The Hydration Process
Think of it like this: we immerse the anodized part in hot deionized water or a chemical bath. This causes a reaction. The aluminum oxide on the surface swells and effectively "seals" itself shut.
| Feature | Before Sealing | After Sealing |
|---|---|---|
| Surface Pores | Open and porous | Closed and sealed |
| Material State | Anhydrous aluminum oxide | Hydrated aluminum oxide |
This simple process is vital for long-term durability. It prevents contaminants from getting trapped inside the coating.
The Critical Trade-Off: Hardness vs. Resistance
Sealing isn’t always the right choice. There’s a significant trade-off every engineer must consider for a hard anodized finish. It’s a balance between ultimate hardness and environmental protection.
Why Sealing Improves Resistance
By closing the pores, we create a barrier. This barrier is incredibly effective against moisture and corrosive elements. This is why sealed parts excel in harsh environments. The improved surface also helps with color fastness for dyed parts. It locks the pigment in.
The Impact on Hardness
However, the sealing process slightly softens the surface. The resulting hydrous aluminum oxide4 is not as hard as the original, unsealed coating. In our tests with clients, this reduction can be around 10-20%. For parts where abrasion resistance is the top priority, leaving the surface unsealed might be the better option.
Deciding whether to seal is a critical step. At PTSMAKE, we always discuss the part’s end-use with our clients to make the best recommendation.
| Property | Unsealed Hard Anodize | Sealed Hard Anodize |
|---|---|---|
| Corrosion Resistance | Good | Excellent |
| Abrasion Resistance | Excellent | Very Good |
| Color Fastness | Fair | Excellent |
| Best For | High-wear parts | Corrosive environments |
This decision directly impacts the performance and lifespan of the final component.
Sealing closes the pores on a hard anodized surface through hydration. This boosts corrosion resistance and color retention. However, it comes at the cost of a slight reduction in surface hardness, a key trade-off for component design.
What are the major process stages in a hard anodizing line?
A successful hard anodized finish is not a single step. It’s a carefully controlled, sequential process. Each stage perfectly prepares the part for the next. Skipping or rushing any step will compromise the final quality and performance. It is a true chain reaction.
The Anodizing Journey
The entire process flow is designed for consistency. At PTSMAKE, we view it as a journey with three main phases.
| Phase | Key Stages |
|---|---|
| Pre-Treatment | Cleaning, Rinsing, Etching/Deoxidizing |
| Anodizing | The main anodizing bath process |
| Post-Treatment | Rinsing, Dyeing (optional), Sealing, Drying |
This disciplined approach ensures a flawless, durable finish.
Let’s dig deeper into the "why" behind each of these stages. Understanding the purpose of each step clarifies why precision is so critical in this manufacturing process.
Pre-Treatment: Setting the Stage
This initial phase is all about preparation. It creates the ideal foundation for the anodic layer.
Cleaning and Rinsing
We start with a thorough cleaning in alkaline or acidic solutions. This removes all oils, grease, and dirt from machining. A pristine surface is non-negotiable for uniform coating.
Etching and Deoxidizing
Next, etching in a caustic solution creates a uniform matte finish. Deoxidizing then removes the natural, thin oxide layer and any alloys from the surface. This ensures the aluminum is pure and ready for anodizing.
The Main Event: Anodizing
This is where the magic happens. The part is submerged in a chilled acid bath, typically sulfuric acid. It acts as the anode in an electrochemical5 circuit. A controlled electrical current is passed through it. This builds a thick, hard, and porous aluminum oxide layer.
Post-Treatment: Finishing Touches
After the oxide layer is formed, we must protect and finish it. Rinsing stops the chemical reaction. If a color is specified, the part goes into a dye bath. The pores absorb the colorant. The final, critical step is sealing. We use hot water or chemical seals to close the pores. This locks in the color and maximizes corrosion resistance.
The hard anodized line is a methodical process where each stage builds upon the last. From meticulous surface preparation to the final sealing, every step is essential. It ensures the creation of a durable, high-performance coating that meets strict specifications.
How do industry standards (e.g., MIL-A-8625) structure quality requirements?
Industry standards like MIL-A-8625 are crucial. They provide a clear framework for quality. This ensures everyone speaks the same language. It removes guesswork from the process.
Let’s focus on aluminum anodizing. The standard classifies coatings by type. Type III is what we call hard anodized. It’s known for its superior durability. The specification details what to measure.
This structure creates predictable, reliable results. It’s how we guarantee quality for demanding applications.
| Coating Type | Common Name | Key Feature |
|---|---|---|
| Type I | Chromic Acid Anodize | Thin, good for paint adhesion |
| Type II | Sulfuric Acid Anodize | Decorative, moderate protection |
| Type III | Hard Anodize | Maximum durability and wear |
This ensures every part meets the exact performance needs.
MIL-A-8625 creates a blueprint for success. It meticulously defines testable quality requirements. This is especially true for Type III, or hard anodized, coatings.
Coating Thickness Verification
The standard specifies exact thickness ranges. For Type III, this is typically around 0.002 inches (50.8 microns). We use eddy current testing to verify this. It’s a non-destructive method that ensures compliance without damaging the part. Consistent thickness is vital for performance.
Hardness and Wear Resistance
While the spec doesn’t list a direct Rockwell hardness value, it focuses on wear resistance. This is the true measure of a hard anodized surface. Taber abrasion tests are often used to quantify this. The results show how the coating withstands friction over time.
Salt Spray Testing
This is a critical test for corrosion resistance6. Parts are placed in a chamber with a salt spray. This simulates harsh environmental conditions. A Type III coating must withstand this for a specific duration, often hundreds of hours, without showing significant pitting or degradation.
Here is a breakdown of typical requirements for MIL-A-8625 Type III:
| Requirement | Typical Specification | Test Method |
|---|---|---|
| Coating Thickness | 0.002" ± 0.0002" | ASTM B244 |
| Coating Weight | Varies by alloy | ASTM B137 |
| Corrosion Resistance | 336 hours (unsealed) | ASTM B117 Salt Spray |
| Sealing Quality | Pass/Fail (acid dissolution) | ASTM B680 |
At PTSMAKE, we follow these tests rigorously. It ensures every component we deliver performs flawlessly in its final application.
MIL-A-8625 provides a structured framework, classifying coatings and defining testable metrics. This ensures quality for processes like hard anodized coatings by specifying requirements for thickness, durability, and corrosion resistance, creating reliable and consistent parts.
What are the common categories of hard anodizing process defects?
When a hard anodized finish fails, identifying the problem is key. A systematic approach helps diagnose the issue quickly. We can group these defects into clear categories.
Each failure has a distinct visual signature. This makes initial inspection straightforward. Understanding these signs is the first step toward a solution.
Here is a quick guide to recognizing them.
| Defect Category | Visual Signature |
|---|---|
| Burning | Dark, rough, and discolored patches. |
| Soft Coating | A dull finish that scratches easily. |
| Pitting | Small, localized holes on the surface. |
| Color Inconsistency | Uneven shades or blotchy appearance. |
| Dimensional Errors | Parts do not meet size specifications. |
This classification helps us pinpoint the root cause more effectively.
Let’s explore these defects in more detail. Each one points to a specific issue in the hard anodizing process. Understanding the "why" is crucial for prevention.
Burning and Overheating
Burning often occurs at sharp edges. It’s a sign of excessive current density or poor electrical contact. The area looks charred and feels rough. This severely compromises the protective layer of the part.
Soft or Powdery Coatings
A soft coating fails to provide the necessary wear resistance. This usually results from incorrect bath temperature or electrolyte concentration. The expected hard surface is instead chalky and can be rubbed off. The coating’s intended columnar structure7 fails to form correctly, leading to poor performance.
Pitting and Corrosion
Pitting appears as tiny cavities on the surface. This defect is often caused by contaminants. Contamination can be on the aluminum part itself or within the anodizing tank. Improper cleaning before the hard anodized process is a frequent culprit.
Color and Dimensional Issues
Inconsistent color is an aesthetic flaw. It can signal underlying process variability. Dimensional errors happen when the growth of the anodic layer isn’t factored into the initial machining. At PTSMAKE, we always account for this growth to ensure final parts are within tolerance.
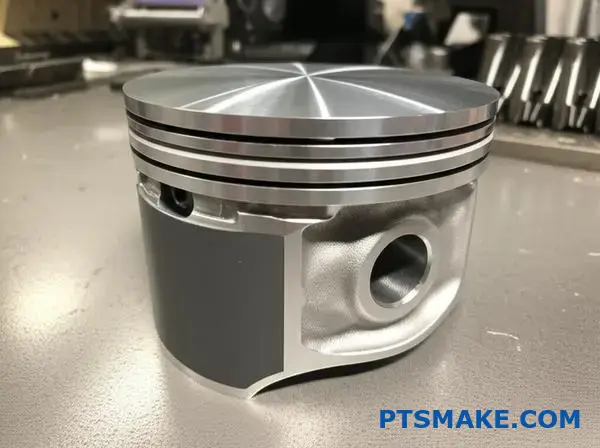
How would you choose and specify a hard coat for a high-wear piston?
Let’s apply this knowledge to a real problem. Choosing a coating for a high-wear piston isn’t just about picking the hardest option.
You must balance multiple engineering needs. This includes the base alloy, final part dimensions, and lubricity.
A detailed specification is crucial. It ensures the final part performs exactly as designed. It removes ambiguity for your manufacturing partner.
Key Piston Requirements
| Feature | Requirement | Reason |
|---|---|---|
| Base Alloy | High Strength | Withstands mechanical stress |
| Hardness | >60 HRC | Resists abrasive wear |
| Lubricity | Low Friction | Ensures smooth operation |
| Tolerances | Tight | Guarantees proper fit and function |
Solving this problem requires a systematic approach. A vague instruction like "hard coat this part" often leads to failure. Every detail matters for performance.
We start with the base material. For a high-performance piston, 7075-T6 aluminum is an excellent choice. It offers a superior strength-to-weight ratio compared to 6061 alloy.
Next, we specify the coating itself. A MIL-A-8625 Type III hard anodized finish is the standard for wear resistance. We must also define the coating thickness. This directly impacts the final part dimensions. A common mistake is forgetting that hard anodizing adds material to the surface.
Based on our tests, a 0.002-inch thickness is a good starting point. This provides a hardness equivalent of 60-70 Rockwell C. For added lubricity, we can specify a post-treatment. PTFE impregnation significantly improves the tribological properties8 of the surface, reducing friction.
Sample Specification Callout
Here is how we might structure a specification callout on an engineering drawing.
| Specification Item | Detail |
|---|---|
| 1. MATERIAL | Aluminum Alloy 7075-T6 |
| 2. FINISH | Hard Anodize per MIL-A-8625, Type III, Class 1 (non-dyed) |
| 3. THICKNESS | 0.0020" ± 0.0002" on all functional surfaces shown. |
| 4. HARDNESS | 60-70 HRC (equivalent). Verify on sample coupon. |
| 5. POST-TREATMENT | Impregnate with PTFE lubricant after anodizing. |
| 6. MASKING | Mask all threaded holes and non-functional areas as noted. |
| 7. NOTE | All final part dimensions apply after coating and post-treatment. |
This detailed callout ensures clarity. It tells your manufacturing partner, like us at PTSMAKE, exactly what you need. This precision prevents costly errors and delays.
A clear specification is key. It defines the base alloy, coating type, thickness, and post-treatments. This ensures the high-wear piston will meet its demanding performance requirements, resulting in a reliable and long-lasting component for your assembly.
How would you adapt the process for a marine part requiring maximum corrosion resistance?
When creating a part for marine use, standard processes are not enough. The constant saltwater exposure demands maximum corrosion resistance. We must adapt the hard anodized process significantly.
Targeting Coating Thickness
The first step is a thicker coating. We aim for a minimum of 50 microns. This dense layer acts as a robust barrier. It is crucial for long-term durability in the sea.
The Sealing Imperative
Next, we focus on sealing. A high-quality seal is non-negotiable. It closes the pores of the anodic film. This prevents saltwater from penetrating the substrate.
| Process Step | Standard Spec | Marine-Grade Spec |
|---|---|---|
| Coating Thickness | 25 microns | 50+ microns |
| Sealing Method | Hot Water Seal | Dichromate Seal |
| Quality Control | Salt Spray (200 hrs) | Salt Spray (500+ hrs) |
This enhanced process ensures parts withstand the harshest marine conditions.
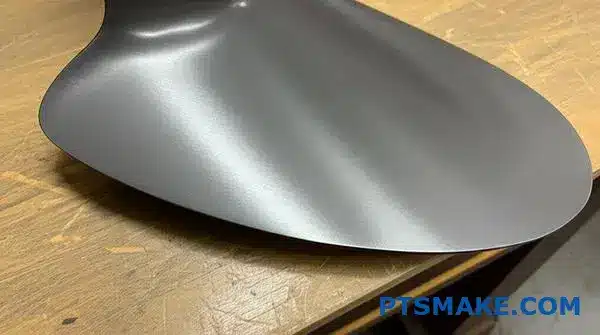
To truly fortify a marine part, every process variable must be optimized. The goal is creating an impenetrable defense against chloride ions in seawater. At PTSMAKE, we’ve found that a thicker hard anodized coating is the foundation of this defense.
Why 50 Microns is the Magic Number
A standard hard coat might be 25 microns. For marine applications, we double that to at least 50 microns. This thickness provides substantial physical protection. It prevents minor scratches from compromising the aluminum substrate beneath. A thicker layer simply takes longer to breach. This is critical when dealing with potential galvanic corrosion9 between dissimilar metals on a vessel.
The Power of a Dichromate Seal
After anodizing, the surface is porous. Sealing is essential. While a hot water seal is common, a dichromate seal offers superior corrosion inhibition. The hexavalent chromium compounds actively passivate the surface. This provides an extra layer of chemical protection. Note that regulations may restrict its use, so we always verify compliance with our clients.
| Parameter | Rationale for Marine Adaptation | Benefit |
|---|---|---|
| Increased Thickness | Creates a more substantial physical barrier against saltwater ingress. | Enhanced durability and wear resistance. |
| Dichromate Sealing | Provides active chemical corrosion inhibition within the coating’s pores. | Significantly extends service life in saline environments. |
| Tighter Process Control | Ensures consistent coating density and integrity across the entire part. | Reduces weak points and potential failure. |
For marine parts, achieving maximum corrosion resistance requires a thicker hard anodized layer (50+ microns) and a superior sealing method, such as a dichromate seal. This robust combination creates a durable barrier against harsh saltwater environments.
How should an engineer design a part to facilitate better hard anodizing?
Design for Manufacturing (DFM) is crucial. It ensures your parts get the best possible hard anodized finish. Simple design choices can prevent common failures.
This saves you time and money. More importantly, it results in a higher quality, more reliable final product.
Essential DFM Guidelines
Generous corner radii are non-negotiable. Sharp corners attract too much electrical current. This can burn the coating, making it brittle.
You should also consider deep holes and threads. These features require special attention to ensure a uniform coating.
| Design Feature | Recommendation | Why It Matters |
|---|---|---|
| Internal Corners | Use a radius >0.5mm | Prevents current buildup and burning |
| External Corners | Break all sharp edges | Avoids a fragile, thin coating |
| Blind Holes | Design with a low depth-to-width ratio | Ensures chemicals can enter and exit |
| Threads | Specify pre-anodizing tolerances | Accounts for the coating thickness buildup |
A Deeper Look at Anodizing-Friendly Design
A superior hard anodized finish begins with the CAD model. By anticipating the electrochemical process, you avoid costly rework. Small design details make a huge difference in the anodizing tank.
Managing Current Density
Sharp corners and edges act like lightning rods. They concentrate the electrical current during the anodizing process. This high current density creates excess heat, which can burn the coating. A burned coating is weak and can flake off. Adding a simple, generous radius diffuses this current.
Navigating Complex Geometries
Deep pockets and small blind holes present a unique challenge. They can experience something called the Faraday cage effect10. This electrical shielding prevents the current from reaching deep into recesses. The result is often an inconsistent or completely missing anodic layer in those areas.
Planning for Racking and Threads
Every part must be held by a rack in the anodizing tank. These contact points will leave small, uncoated marks. As engineers, we should design parts with designated, non-critical surfaces for racking. In past projects at PTSMAKE, we’ve found that specifying these locations on the print eliminates any confusion. For threads, always account for the coating buildup. We must machine them to a specific tolerance before anodizing to ensure they are within spec after coating.
To get the best hard anodized parts, think about the finishing process from the start. Plan for generous radii, accessible holes, adjusted thread tolerances, and smart racking locations. This DFM approach prevents defects and ensures a durable, uniform coating.
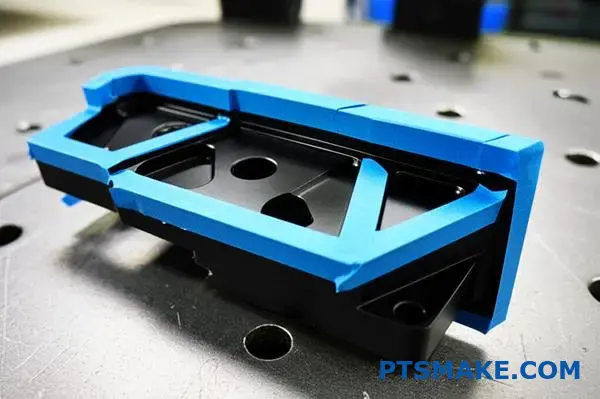
How would you implement selective masking for a complex component?
Selective masking is crucial for complex parts. It protects specific areas during finishing. This is especially true for a hard anodized coating. The goal is to get clean, sharp edges.
Choosing the right method is key. Each has its own strengths and weaknesses. It depends on the part’s geometry.
Comparing Masking Methods
| Method | Best For | Application Speed |
|---|---|---|
| Tapes | Flat Surfaces, Straight Lines | Fast |
| Lacquers | Complex Curves, Irregular Shapes | Medium |
| Plugs | Holes, Threads, Bores | Very Fast |
Success requires precision in application and removal. Without it, you risk leakage or damage.
The Art of Application and Removal
Perfect masking is more than just covering a surface. It demands a meticulous process. At PTSMAKE, we’ve refined this for optimal results on intricate parts. The application stage sets the foundation for success.
First, the surface must be perfectly clean. Any oil or debris will compromise the seal. This can lead to coating bleed under the mask.
Next, the maskant is applied. For tapes, this means no air bubbles. For lacquers, it requires an even coat of the correct thickness. Custom plugs must fit snugly.
Preventing Leakage and Damage
Ensuring sharp edges is the final test. This is where experience really matters. The removal process is just as critical as the application.
If removed too early, the coating may be soft. Too late, and the maskant might be difficult to remove. This could damage the hard anodized finish. We often use specific techniques to score the edge before removal. This breaks the coating cleanly. It prevents chipping and ensures a perfect line every time. This precision is vital to avoid unwanted capillary action11 of the coating solutions.
| Stage | Key Action | Desired Outcome |
|---|---|---|
| Preparation | Thorough Cleaning | Strong Maskant Adhesion |
| Application | Precise Placement | Complete Seal, No Gaps |
| Removal | Timely & Careful | Sharp Edges, No Damage |
Proper masking for complex parts involves choosing the right method—tapes, lacquers, or plugs—and mastering the application and removal process. This ensures clean edges and protects the coating integrity, preventing costly rework.
Get Expert Hard Anodized Solutions with PTSMAKE
Ready to upgrade your products with precision hard anodized finishes? Contact PTSMAKE today for a custom quote. Our team ensures high-quality, on-spec hard anodizing and CNC solutions tailored to your industry. Send your inquiry now and let us deliver reliability, consistency, and world-class support from prototype to production!

Understand how the electrolyte solution is key to controlling the final hardness, color, and corrosion resistance of the part. ↩
Understand how this chemical reaction is controlled to create a superior coating. ↩
See how this electrical parameter directly impacts your part’s hardness and wear resistance. ↩
Understand the chemical transformation that occurs during the sealing process. ↩
Discover the science behind how this process builds protective layers on metal surfaces. ↩
Discover how this property is tested to guarantee your part’s lifespan in harsh environments. ↩
Understand the microscopic formation of anodic coatings to better diagnose material failures. ↩
Understand how friction, wear, and lubrication impact a part’s long-term performance. ↩
Understand how different metals can accelerate corrosion when in electrical contact in saltwater. ↩
Discover how this shielding phenomenon affects coating uniformity in recessed areas of your design. ↩
Learn the science behind maskant leakage and how to prevent it. ↩